This week Papertrey Ink has a tutorial and challenge hosted by Danielle. She has shown us a fabulous idea and technique to use our coverplate dies to create masks to use with dimensional paste to create the coolest flocking effect on our projects. So incredibly cool!
I'll admit, I went to the store to buy some paste (as I didn't have any) and the technique looked so neat. I ended up buying "Light Molding Paste" and it was kinda pricey, but I used a coupon and let me just say that the fun I've had with this technique was totally worth it! If you would like to check it out for yourself, you can find all the info here.
I went through my coverplate dies and decided to use the one that looks like a knit sweater. When I saw it, I knew I would pair it with the new Two Feet Deep stamp set. I also layered in a diecut from the new Fancy Flakes set. I thought the snowflake needed some shimmer, so I spritzed it with some Glimmer Mist.
I put the sentiment on the inside:
For my second attempt, I used the Mighty Oak coverplate die. I thought I'd be smart and make a reusable mask this time. The clear card stock is a bit thinner than the PTI card stock and I found it allowed the paste to slip under the mask a bit. I guess I'll stick with paper masks from now on. lol!
After the paste dried, I went ahead and stamped right on top of it. The pattern of the stamps was lost a bit on the paste, so I found I didn't care for this look as much as letting the paste stand on it's own. The paste itself looks so cool and I found it acted like a chameleon, changing color depending on that which it was applied to. If you haven't tried the paste for yourself, I highly recommend it!
Unless otherwise noted, all supplies are from PTI.
Thanks ever so much for stopping by!
This month's PTI Blog Hop challenge is wreaths: to create a project incorporating a wreath. Fun and festive, right? Yes!
The only wreath stamp set that I own is Papertrey Ink's Birds and Blooms set ... of which I had not used to stamp a wreath! That's one of the things I like best about challenges - they get me to use supplies I've been too busy to get around to using. :) And let me tell you, this stamp set is gorgeous! The details are incredible! It makes for a beautiful, one-layer, easy to mail card. Wouldn't you agree?
I had a bit of trouble lining up the flower stamps properly within the leaves, so I filled it out a bit with a few singles and the cute dot trio from Mini Blooms. The finishing touch was to top the wreath off with a bow from Bells and Boughs.
I decided to go the extra distance to decorate the inside of the card as well as the front and back of the envelope.
All supplies used are from Papertrey Ink.
Thanks ever so much for stopping by!
This week Papertrey Ink has a tutorial and challenge hosted by Dawn. She has shown us how to make a stunning project layering multiple border die cuts. Dawn made such a beautiful card! If you would like to check it out for yourself, you can find all the info here.
I had done this technique once before using various scallop punches instead of dies. So, for this challenge, my first thought was to use my PTI cloud dies. I know it's not technically a border die, but I think the idea, process, and the resulting look are just the same. What do you think?
I used a sponge and distress inks to create the rainbow and sky at the top of the card front, then adhered cloud die cuts all the way down the panel. Lastly, I added a sun die cut out of Harvest Gold card stock.
Inside the card, I included the sentiment from PTI's Movers and Shakers stamp set. I achieved the rainbow effect by carefully masking. Not perfect, but it will have to do as I'm not quite brave enough to cut apart my stamps just yet. :)
Thanks ever so much for stopping by!
This week Papertrey Ink has a tutorial and challenge hosted by Erin. She has shown us a fabulous idea and technique to use our dies to create fabric iron-ons for our crafting pleasure. Wow! It's so easy and totally fun!! If you would like to check it out for yourself, you can find all the info here.
I went to my stash and dug out a burlap drawstring bag. Then, I rummaged through my fabric bin and was pleasantly surprised to actually find some heat 'n bond in there! I used Erin's technique to cut a doily out of muslin fabric and a circle with an owl cut out of it in vintage cream felt. I used another circle cut out of muslin to stamp the owl and color it with Copics. I stitched around the felt after ironing it onto the doily, then I ironed the doily onto the burlap bag. Quite simple, really.
Stamps & dies are from PTI.
Thanks ever so much for stopping by!
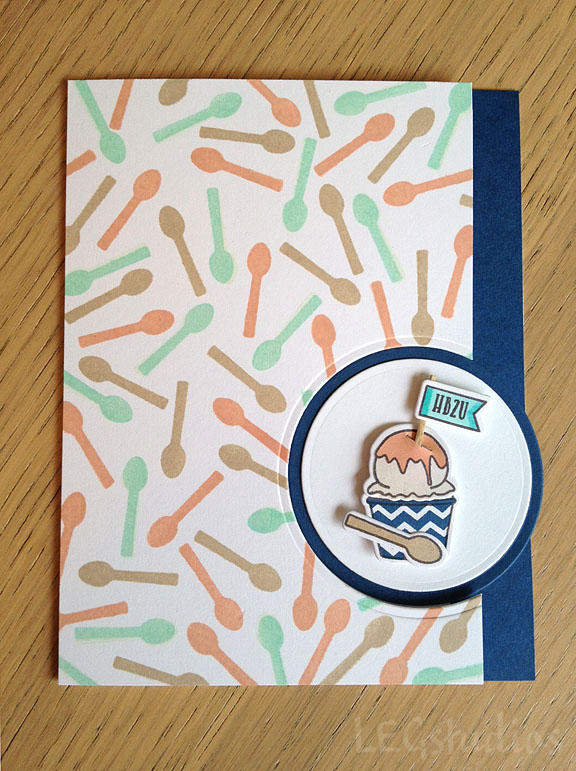
Hello! I'm playing along with the Monday Mood Board #19 challenge over at WPlus9 this week. If you haven't checked out the beautiful inspiration photo and swoon-worthy entries, you can do so here.
I was inspired by the colors in the photo, but wanted to add a bold pop of navy. Here is what I came up with.
The front panel of the card base has a cutout so that the focal point can be seen from both the front and inside of the card.
I decorated the inside of the card too! :)
Thanks ever so much for stopping by!