This week Papertrey Ink has a tutorial and challenge hosted by Heather. She has shown us how to easily layer die cuts and add glitter for just the right amount of sparkle and glitz for our projects. If you would like to check it out for yourself, you can find all the info here.
I decided to take advantage of this week's challenge to make the project I was working on extra special. I can't say I would have ever made an entire tag covered in glitter if it weren't for Heather's tutorial, but oh, do I ever like the results! Take a look and let me know what you think ...
I made a thank-you card set for my daughter's teacher. She loves cooking, but I don't have any cooking-themed stamp sets. So, I went for the cutest alternative ... Gingerbread Lane. I just love that set!
I made a set of cards based off of a design I had made earlier. Pretty much a CASEing of this house design done by the ever so talented, Danielle.
I chose Pure Poppy, Sweet Blush, Aqua Mist, Vintage Cream, and Dark Chocolate for my color scheme.
A closer look at the cards:
A closer look at a gingerbread house:
Some embellished envelopes to coordinate:
Lastly, I packaged the set up in glassine bags, tied with twine, and layered with doilies and the challenge, all-over glittered, tag.
Doesn't it look like it is sugar-coated? I love that!
Just about all the supplies are from PTI.
Thanks ever so much for stopping by!
PTI Make It Monday #94: Detail Glitter Technique
This week Papertrey Ink has a tutorial and challenge hosted by Erin Lincoln. She has shown us how to get small precision glittered accents on our stamped images for just the right amount of sparkle. If you would like to check it out for yourself, you can find all the info here.
Moxie Fab Tuesday Trigger: Shimmer & Shine
I was so inspired by the color scheme and holiday elegance of the Moxie Fab Tuesday Trigger: Shimmer & Shine. I decided that a wine bottle tag would be the perfect project to shimmer up and make it shine!
The tag is cut out of Stampers Select White card stock, and heat embossed in clear with the BB: Wrought Iron stamp set to give it a shiny, frilly background to mimic the scroll-work of the silver platter in the Trigger photo. I rolled some flowers out of Rustic Cream card stock and used Erin's technique to glitter the edges. Inspired by the rough texture of the platter surface, a few glittered die cut leaves were added to accent the flowers.
The sentiment was stamped in gold ink to reflect the color of the ornaments. A few clear rhinestones, inspired by the glass flowers sitting in the platter, were added to accent the sentiment.
I cannot wait to give this for a hostess gift over the holidays!
All that sparkle just makes me happy. :)
Thanks ever so much for stopping by!
This week Papertrey Ink has a tutorial and challenge hosted by Erin Lincoln. She has shown us how to get small precision glittered accents on our stamped images for just the right amount of sparkle. If you would like to check it out for yourself, you can find all the info here.
Tis the season for holiday gifting.
I really don't enjoy cooking or baking. I really just don't. Despite this fact, I managed to make 13 dozen iced buttermilk cookies to gift to teachers, bus drivers, and neighbors last year. I figured I would do my best to repeat the gesture this year. :)
I decided to dress-up some plain window coffee bags and make matching tags to gift my cookies in. I came up with a couple of different designs and liked them both so much that I thought I would use the snowflake design this year and save the poinsettia design for next year. LOL!
However, to make things more complicated, we have a new bus driver to add to the mix ... a male bus driver. Sooooo, I purchased the In the Meadow stamp set and created a masculine tag to adorn his bag of cookies. :)
Erin's precision glitter technique lent itself beautifully to these little tags. I used a Quickie Glue pen and glitter to highlight details on the snowflakes, veins on the poinsettia, and snow-topped hills on the meadow tag. The technique created just a touch of sparkle to make the tags look festive without over-doing it.
The snowflake tag:
The bags and tags together:
The poinsettia set:
Close-up of that sparkly poinsettia:
A look at the back of the tag:
The bag is stamped with poinsettias from Year of Flowers Collection stamp set:
The masculine meadow tag:
Close-up of the snow-topped hills:
So, what do you think? Do you have a favorite set? I really do like them all!
Thanks ever so much for stopping by!
This week Papertrey Ink has a tutorial and challenge hosted by Erin Lincoln. She has shown us how to get small precision glittered accents on our stamped images for just the right amount of sparkle. If you would like to check it out for yourself, you can find all the info here.
This week I had a need for a sympathy card and Erin's tutorial was just what I needed to make a nice card extra special. I used a Quickie Glue pen to outline the hearts in the center of the butterflies. It created just a touch of sparkle to make the card look more elegant, but not so much sparkle to prevent the glitter from ruling over the design. It was the perfect touch to add to my sympathy card. Thanks, Erin!
A close-up of those glitter-outlined hearts:
On the inside of the card, I added some shine with a Gelly Roll clear pen. I do declare that I like the results done with Erin's technique and the Prisma glitter so much better!
Supplies (all PTI unless noted):
Paper: Stampers Select White, Melon Berry
Stamps: Heart-2-Heart #10
Ink: Soft Stone, Sweet Blush, Melon Berry, Berry Sorbet, Pure Poppy
Other: Quickie Glue Pen, Prisma glitter, Gelly Roll clear pen
Thanks ever so much for stopping by!
This month's PTI Blog Hop challenge is to gleam inspiration from a variety of non-traditional holiday color schemes to create a project. Nichole provided us with six gorgeous non-traditional holiday color scheme inspiration photos. I love each color scheme, and really wish I had time to create a project for every one of them! If you would like to check things out for yourself, you can find out all about it here.
For this challenge I decided to use the color scheme in the second inspiration photo. I think it's my favorite color scheme from the bunch. Isn't it just delicious?
While looking at this color scheme, the first thought that came to my mind was fun & whimsy, which lead me to think of the great Gingerbread Lane stamp and die set that I hadn't been able to try out just yet. I really liked the gingerbread houses that Daniel made during release countdown week, so I case'd her design while using this great color scheme. (FYI - while stamping, I found that Hibiscus Burst was a bit dark for my needs and decided to substitute it with Sweet Blush).
I worked on both of the houses at the same time, trying to use a little bit of each of the colors from the inspiration photo. I'll admit, it was late and my brain had apparently gone to sleep, since I found that I'd glued bits and pieces together which I hadn't originally intended to. And, umm ... well, it wasn't an isolated incident, as it happened more than once. So, I ended up with one mostly turquoise house and one mostly pink house. ha!
I added one house to a Tag Sale #4 die cut from Aqua Mist card stock, and the other to a pillow box die cut from Sweet Blush card stock, spritzed with a pearl mist, and impressed with the Picnic Plaid impression plate. Both projects sport the same sentiment stamped in Hawaiian Shores, with the word "sweet" from Strawberry Patch stamped in Raspberry Fizz.
Wouldn't this pillow box be perfect to gift someone special with a sugary treat packaged inside?
Aside from the pearls, bakers twine, and glittery embossing powder, all supplies are from PTI.
Thanks ever so much for stopping by!
This month's PTI Blog Hop challenge is to gleam inspiration from a variety of non-traditional holiday color schemes to create a project. Nichole provided us with six gorgeous non-traditional holiday color scheme inspiration photos. I love each color scheme, and really wish I had time to create a project for every one of them! If you would like to check things out for yourself, you can find out all about it here.
For this challenge I decided to use the color scheme in the fourth inspiration photo. Isn't it lovely?
This color scheme just made me think of poinsettias. I couldn't decide between making a red or white poinsettia, so I compromised and made both! haha!
The wine bottle tag has a rustic white base, a sentiment stamped with Ocean Tides ink, and a decorative swirly-do (yes, I'm sure that's the correct name for it :) from the Over Under Easy stamp set in Pure Poppy ink.
The poinsettia petals are die cut from Pure Poppy card stock, the leaves from Pinefeather, and the center from Limeade Ice. The entire flower is glittered up with stardust pens and Stickles.
The pillow box is die cut from Pure Poppy card stock, and the sentiment from Bells & Boughs is stamped in gold and heat embossed in glittery powder.
The sentiment doesn't stand out as much as I would have preferred, but will have to chalk it up as a learning experience!
The poinsettia petals are die cut from Rustic White card stock, the leaves from Pinefeather, and the center from Limeade Ice. Again, the entire flower is glittered up, but this time using only Stickles.
Thanks ever so much for stopping by!
This month's PTI Blog Hop challenge is to gleam inspiration from a variety of non-traditional holiday color schemes to create a project. Nichole provided us with six gorgeous non-traditional holiday color scheme inspiration photos. I love each color scheme, and really wish I had time to create a project for every one of them! If you would like to check things out for yourself, you can find out all about it here.
For this challenge I decided to use the color scheme in the third inspiration photo. It was the color scheme that I was first drawn to from the bunch. Isn't it gorgeous?
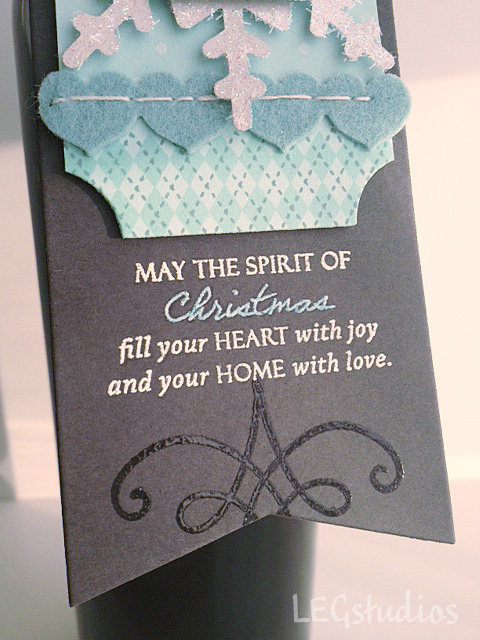
I was so inspired that I ended up making two projects for this color scheme! The first being a wine bottle tag, perfect to gift at a Holiday get-together.
It is made with a Smokey Shadow base with the sentiment embossed in white and colored with Copic markers. A decorative flourish from the Over Under Easy stamp set is embossed with clear powder under the sentiment. I love the decorative touch it adds.
The focal point consists of a house die cut from Love Lives Here from Ocean Tides. The bottom half is stamped in Fresh Snow using BB: Text Style and the roof is stamped in Ocean Tides ink with one of the patterns from Bitty Background Blocks.
The house sits upon a glittered snowflake die cut layered on top of a trimmed Mat Stack 3 die cut, stamped with BB: Polka Dot Basics and BB: A Little Argyle. The finishing touch is the sewn-on heart border cut from Ocean Tides felt.
My second project is a nifty little gift card holder using the Seed Packet Die. The seed packet was die cut from Aqua Mist card stock and stamped with Erin's new Striped Sweater background set. What a match made in heaven! I can totally see giving a clothing store gift card in this sweet little package! The sweater stripes were stamped with Fresh Snow, Aqua Mist, Ocean Tides, and Smokey Shadow inks.
And, to keep with the sweater/clothing theme, I chose the "Wishing you a Cozy Christmas" sentiment from Peaceful Pinecones to stamp onto the vellum label cut with the Happy Day die. A *heavily* glittered branch/pinecone from the Peaceful Pinecones set serves as the main focal point.
Die cuts from the Buttoned Up #1 dies serve as closures for the packet. Button-shaped cuts from coaster board and Smokey Shadow card stock were glued together, stamped with designs from the Delightful Doilies stamp set, and then heat embossed with glittery embossing powder. I really like how the buttons turned out!
Thanks ever so much for stopping by!
It's World Card Making Day! What have I been doing on World Card Making Day? Freezing my tukas off at soccer games ... morning, noon, and night. Literally, we had a game early this morning, one at noon, and another one tonight. We would have had a fourth game today, but the opposing team cancelled it. Oh, how I wish I could have spent the whole day, warm and cozy, crafting in my jammies!
Between games, I did manage to eek out one little card. I decided to use Dawn McVey's Glittered Tabs technique to also enter into this week's Make It Monday over at PTI. If you would like to check out Dawn's great video tutorial, you can find it here.
I took inspiration from Betsy Veldman's wonderfully cheerful winter color scheme I spied on her blog during the latest PTI release. I just love the look of her colorful snowflakes using the new Snowflake Medley set.
Here is a close up of that pretty glittered tab. I used 1/2" and 1/8" strips of Scor-Tape to adhere my glitter since I don't own any variety of the glue pads. I used some Prisma glitter from PTI on the 1/8" strip, and some turquoise glitter (that I got from JoAnns eons ago, no name on the bottle) on the 1/2" strip.
All supplies are from PTI, aside from those already mentioned and bakers twine, thread, glimmer mist, and Versamark ink.
Thanks ever so much for stopping by!
This month's PTI Blog Hop challenge is to gleam inspiration from the above photo and use it to have fun experimenting with fabric & felt. I love all of the fun fabric goodness found in the inspiration photo! If you would like to check things out for yourself, you can find out all about it here.
For this challenge I decided to make some pillow boxes using my new die from PTI. I used Melissa Phillips' die-cutting fabric technique to die cut my pillow boxes out of various fabrics: burlap, muslin, cotton patterned, and even some minky dot!
The pillow boxes are perfectly sized to fit a gift card, and what's better than a gift card? A gift card wrapped up with a pretty pin/clip embellishment that you can detach and wear!
My favorite of the lot has to be the minky dot. It is so, so soft ... a perfect gift for a baby shower. The satin flower with pearl and glass bead center is attached to a baby headband with a detachable pin/clip.
How cute would that flower look on a newborn's head? Pack a BabiesRUs giftcard or something similar into the pillow box, and you've got a complete gift!
The cotton patterned pillow box has a detachable flower on a pin/clip made from PTI's awesome-quality felt in Pure Poppy. There is an elastic hair band wrapped around the pillow box and the flower is clipped onto it.
I used the same technique with the burlap pillow box. A flower trio on a detachable pin/clip which is clipped onto the elastic hair band.
A close-up of that gorgeous texture:
The muslin pillow box is decorated with a felt die cut from PTI's Holiday Button Bits set. Pure Poppy buttons were hand sewn in place. The sentiment from PTI's Happy Day set is stamped using Palette Noir ink. I love the homespun feel the muslin gives that pillow box!
Thanks ever so much for stopping by!